Hi,
if you are experiencing Windows (2016 server in my case) in remote desktop to automatically change the Keyboard Layout to the default (ENG) one, whatever you set , you are in the right place.
In the last days I fought against my Windows 2016 server. I set the keyboard layout to ITA but without apparent reason it automatically revert to ENG anytime .
I tried in many way to fix it, but it always reverted to ENG, also if in the control panel I deleted any keyboard layout and left just the one I wanted.
Solution:
open regedit, navigate here (be careful! Layout - NOT Layouts )
HKEY_LOCAL_MACHINE\SYSTEM\CurrentControlSet\Control\Keyboard Layout
create this :
IgnoreRemoteKeyboardLayout DWORD 1
logout/login (or reboot the machine), the keyboard layout should be now the one selected from you, if the layout is not set to the correct one, set it , then it should not change anymore.

Visualizzazione post con etichetta Windows. Mostra tutti i post
Visualizzazione post con etichetta Windows. Mostra tutti i post
lunedì 21 gennaio 2019

venerdì 23 marzo 2018
Unavailable disk letter in disk manager or mapping network disk
It happened today to me,
I had to map and UNC path to local drive E: but I was not able, like it was already taken and in use.
In detail, I didn't have the letter as available when from explorer (the windows gui) I was trying to map the unc path to a letter.
But then I tried to go to disk manager changing one drive's letter just to see, and the E: letter was not available...
So there was something using it but...
It was not used by some other network disk,
it was not used by a physical device in disk manager
it was not stored in the registry under Mapped Devices (some usb device disconnected maybe...)
in the end the only place where I found a reference to it was like this:
mountvol e: /L
something like this appeared (this is just an example from the command help) :
\\?\Volume{e49c2b64-99e4-11e6-a7c2-806e6f6e6963}\
to check what it was I tried to lauch "execute" from windows (W key + R ), pasted that string (\\?\Volume{e49c2b64-99e4-11e6-a7c2-806e6f6e6963}\) and confirmed...
I got an error, so I think that device , whatever it was , was not anymore connected to my pc.
So I run this other command:
(I take no responsability if you are going to delete mapping to some device needed by your system to work correctly! )
mountvol e: /D
just to check the result of my operation I did this one again:
mountvol e: /L
I got an error, this means the device is not anymore mapped.
I then restarted the pc (maybe a logout was enough?) and voilà, the E: letter was again available! 😄
bye
Digger
I had to map and UNC path to local drive E: but I was not able, like it was already taken and in use.
In detail, I didn't have the letter as available when from explorer (the windows gui) I was trying to map the unc path to a letter.
But then I tried to go to disk manager changing one drive's letter just to see, and the E: letter was not available...
So there was something using it but...
It was not used by some other network disk,
it was not used by a physical device in disk manager
it was not stored in the registry under Mapped Devices (some usb device disconnected maybe...)
in the end the only place where I found a reference to it was like this:
mountvol e: /L
something like this appeared (this is just an example from the command help) :
\\?\Volume{e49c2b64-99e4-11e6-a7c2-806e6f6e6963}\
to check what it was I tried to lauch "execute" from windows (W key + R ), pasted that string (\\?\Volume{e49c2b64-99e4-11e6-a7c2-806e6f6e6963}\) and confirmed...
I got an error, so I think that device , whatever it was , was not anymore connected to my pc.
So I run this other command:
(I take no responsability if you are going to delete mapping to some device needed by your system to work correctly! )
mountvol e: /D
just to check the result of my operation I did this one again:
mountvol e: /L
I got an error, this means the device is not anymore mapped.
I then restarted the pc (maybe a logout was enough?) and voilà, the E: letter was again available! 😄
bye
Digger
martedì 5 gennaio 2016
Deploy Windows 8 WIM image
Disclaimer: I'm not responsible for any damage that could happen to your devices following this guide. It' under your own responsability!
Here a brief description of the steps needed to deploy a W8 WIM image to a BIOS computer:
1. put the WIM image on some sort of USB device (i.e. install.wim)
2. boot the computer with some sort of bootable media that contain DISM (i.e. AIK cd or the W8 installation dvd or AOEMI Backupper or anything else)
3. once booted, from the prompt enter:
select disk 0
clean <--- be careful! this will erase the content of the disk!!
create partition primary size=350
format quick fs=ntfs label=System
assign letter=S
active
create partition primary
format quick fs=ntfs label=Windows
assign letter=W
exit
Let's say install.wim in in the H: drive in a "win8" folder:
dism /apply-image /imagefile:h\win8\install.wim /index:1 /applydir:w:\
now you have the windows file in the W: disk, we need to make it bootable
bcdboot w:\windows /l it-it /s s: /ALL
reboot the pc it should load now the Windows 8 OS just installed
Here a brief description of the steps needed to deploy a W8 WIM image to a BIOS computer:
1. put the WIM image on some sort of USB device (i.e. install.wim)
2. boot the computer with some sort of bootable media that contain DISM (i.e. AIK cd or the W8 installation dvd or AOEMI Backupper or anything else)
3. once booted, from the prompt enter:
select disk 0
clean <--- be careful! this will erase the content of the disk!!
create partition primary size=350
format quick fs=ntfs label=System
assign letter=S
active
create partition primary
format quick fs=ntfs label=Windows
assign letter=W
exit
Let's say install.wim in in the H: drive in a "win8" folder:
dism /apply-image /imagefile:h\win8\install.wim /index:1 /applydir:w:\
now you have the windows file in the W: disk, we need to make it bootable
bcdboot w:\windows /l it-it /s s: /ALL
reboot the pc it should load now the Windows 8 OS just installed
lunedì 12 ottobre 2015
uTORRENT freezes after startup
I got crazy for a day because my uTorrent client (version 3.4.5) that worked well in all my old life, on the new pc freezes seconds after I run it.
Interesting to notice that the 2 areas for the advertisements remain blank as if something is not working with the embedded internet explorer component that shows the advertisements.
By the way, I noticed also that running the PC in safe mode solved the issue,
So it seems there is something running usually that is conflicting with uTorrent.
I did a lot of testing but the good idea came in my mind just the day after:
to check the dll loaded into the uTorrent memory space.
Doing this I found there was all legittimate dlls but I noticed there was 3 NVidia dll injected into uTorrent:
detoured.dll
Nvd3d9wrap.dll
nvdxgiwrap.dll
so why not try to denied NVidia to inject those dll and see the result?
I tried,
the path to the dlls:
C:\Program Files (x86)\NVIDIA Corporation\coprocmanager\
I renamed the 3 dll so thay they are not found anymore,
restarted uTorrent and taaadaa!! it works now!
ok I would investigate if there is some option in the NVidia control panel to disable this thing but honestly I don't have time to waste in this and I don't care about graphics on this pc, so for me is enough.
if anybody knows how to say nvidia to not inject those dll a comment is welcome :)
bye
Digger
Interesting to notice that the 2 areas for the advertisements remain blank as if something is not working with the embedded internet explorer component that shows the advertisements.
By the way, I noticed also that running the PC in safe mode solved the issue,
So it seems there is something running usually that is conflicting with uTorrent.
I did a lot of testing but the good idea came in my mind just the day after:
to check the dll loaded into the uTorrent memory space.
Doing this I found there was all legittimate dlls but I noticed there was 3 NVidia dll injected into uTorrent:
detoured.dll
Nvd3d9wrap.dll
nvdxgiwrap.dll
so why not try to denied NVidia to inject those dll and see the result?
I tried,
the path to the dlls:
C:\Program Files (x86)\NVIDIA Corporation\coprocmanager\
I renamed the 3 dll so thay they are not found anymore,
restarted uTorrent and taaadaa!! it works now!
ok I would investigate if there is some option in the NVidia control panel to disable this thing but honestly I don't have time to waste in this and I don't care about graphics on this pc, so for me is enough.
if anybody knows how to say nvidia to not inject those dll a comment is welcome :)
bye
Digger
mercoledì 16 settembre 2015
Windows NTOP clear all data
If you installed NTOP on Windows machine and want to clear all data to start again from scratch do like this:
1. stop 'ntopng' service
2. stop 'Redis Server' service
3. explore to
c:\program files\Redis\data
4. rename or delete the existing dump.rdb file
5. start 'Redis Server' service
1. stop 'ntopng' service
2. stop 'Redis Server' service
3. explore to
c:\program files\Redis\data
4. rename or delete the existing dump.rdb file
5. start 'Redis Server' service
6. start 'ntopng' service
You should now have a clean situation in the web interface
bye
Digger
You should now have a clean situation in the web interface
bye
Digger
martedì 4 marzo 2014
Disable Skype integration in Outlook.com (web mail)
*** Sorry, This is not working anymore ***
Hi,
do you hate the new Skype integration in Outlook.com like me?
For me Skype and the mails are two different things, I don't want to mix them up, if I want to chat or talk I open Skype, if I open outlook.com is because I need to write or read some mail end of the story.
If you think like me, then this is what I did :
open the file
%systemroot%\system32\drivers\etc\hosts
go to the end and insert this line:
127.0.0.1 skypewebexperience.live.com
That line simply means, when sombody on this pc will search for the ip address of "skypewebexperience.live.com" return the dummy ip address 127.0.0.1 instead, and as for sure the skype service is not on that IP address nobody will answer and skype integration will not work.
Save the file, the effect is immediate.
The effect of this is that when outlook.com try to connect to that address (for skype integration) it will fail and no integration will be available, voilà problem solved
To be honest I'm just testing this now, so not sure if there is some coutereffect, but until now it seems good.
I also tried to start Skype client and it seems everything is working fine there.
If you want to get back to the original situation just open the file again and remove that line or comment it putting a # in front of the line and save the file.
(or, if it's not an issue for you, you can disconnect microsoft account from skype account and then login to skype using the skype account, this way in outlook.com you'll not see skype automatically connected anymore)
bye
Digger
venerdì 31 gennaio 2014
Vmware ESX 3.5 Virtual Center 2.5 client on 64bit OS
Hi,
I know this is a little bit old topic, but there is still people around using Vmware ESX 3.5 version with Virtual Center 2.5 and it happens to change the management desktop to windows 7 64bit and discover that the client installed from the Virtual Center server is not supported on 64bit OS
Around in internet there are some articles with a workaround, but they are old and outdated, the solution is really simple, download the latest version of Virtual Center 2.5 (I found Update 6c) like a .ZIP file,
unzip it, you'll find in there the client setup, that one is working on 64bit clients :)
Here the link where I downloaded it (you need to be logged on the site to open it) :
https://my.vmware.com/group/vmware/details?productId=20&downloadGroup=VC250U6C
I know this is a little bit old topic, but there is still people around using Vmware ESX 3.5 version with Virtual Center 2.5 and it happens to change the management desktop to windows 7 64bit and discover that the client installed from the Virtual Center server is not supported on 64bit OS
Around in internet there are some articles with a workaround, but they are old and outdated, the solution is really simple, download the latest version of Virtual Center 2.5 (I found Update 6c) like a .ZIP file,
unzip it, you'll find in there the client setup, that one is working on 64bit clients :)
Here the link where I downloaded it (you need to be logged on the site to open it) :
https://my.vmware.com/group/vmware/details?productId=20&downloadGroup=VC250U6C
domenica 19 gennaio 2014
WSUS computer not reporting status : Error 0x800b0001
WARNING: Digital Signatures on file C:\WINDOWS\SoftwareDistribution\SelfUpdate\Default\wuident.cab are not trusted: Error 0x800b0001
This is the error I had in my c:\windows\WindowsUpdate.log while I was trying to get my XP computer updated by the WSUS Server I just installed.
After many time spent trying to fix the error in many way I discovered the problem was simply my WSUS server an old version while the XP machine was serching for a most recent WSUS.
So the solution was simply:
1. install WSUS 3.0 SP2 Over the previous WSUS 3.0 installation
2. install the WSUS patch: KB2720211
2. reboot the server
once the server was up and running:
3. on the client run this script (found in internet) :
net stop wuauserv /y
net stop bits /y
net stop cryptsvc /y
RMDIR /S /Q %systemroot%\SoftwareDistribution_Old
ren %systemroot%\SoftwareDistribution SoftwareDistribution_Old
regsvr32.exe c:\windows\system32\wuapi.dll /s
regsvr32.exe c:\windows\system32\wups.dll /s
regsvr32.exe c:\windows\system32\wuaueng.dll /s
regsvr32.exe c:\windows\system32\wucltui.dll /s
regsvr32.exe c:\windows\system32\msxml3.dll /s
regsvr32.exe c:\windows\system32\wuaueng1.dll /s
regsvr32.exe c:\windows\system32\wups2.dll /s
regsvr32.exe c:\windows\system32\wuweb.dll /s
regsvr32.exe c:\windows\system32\atl.dll /s
net start wuauserv /y
net start bits /y
net start cryptsvc /y
wuauclt.exe /resetauthorization
wuauclt.exe /detectnow
wuauclt.exe /reportnow
And after few minutes I seen my client asking me to install new updates, and on the WSUS server the pc appeared with its status. Problem solved :)
This is the error I had in my c:\windows\WindowsUpdate.log while I was trying to get my XP computer updated by the WSUS Server I just installed.
After many time spent trying to fix the error in many way I discovered the problem was simply my WSUS server an old version while the XP machine was serching for a most recent WSUS.
So the solution was simply:
1. install WSUS 3.0 SP2 Over the previous WSUS 3.0 installation
2. install the WSUS patch: KB2720211
2. reboot the server
once the server was up and running:
3. on the client run this script (found in internet) :
net stop wuauserv /y
net stop bits /y
net stop cryptsvc /y
RMDIR /S /Q %systemroot%\SoftwareDistribution_Old
ren %systemroot%\SoftwareDistribution SoftwareDistribution_Old
regsvr32.exe c:\windows\system32\wuapi.dll /s
regsvr32.exe c:\windows\system32\wups.dll /s
regsvr32.exe c:\windows\system32\wuaueng.dll /s
regsvr32.exe c:\windows\system32\wucltui.dll /s
regsvr32.exe c:\windows\system32\msxml3.dll /s
regsvr32.exe c:\windows\system32\wuaueng1.dll /s
regsvr32.exe c:\windows\system32\wups2.dll /s
regsvr32.exe c:\windows\system32\wuweb.dll /s
regsvr32.exe c:\windows\system32\atl.dll /s
net start wuauserv /y
net start bits /y
net start cryptsvc /y
wuauclt.exe /resetauthorization
wuauclt.exe /detectnow
wuauclt.exe /reportnow
And after few minutes I seen my client asking me to install new updates, and on the WSUS server the pc appeared with its status. Problem solved :)
mercoledì 6 novembre 2013
How To Determine Physical Memory on a Remote Machine (slots, chips number and size...)
Hi all,
after a lot of time far from my blog, I'm here again, this time to post a simple and quick command to determine remotely how much physical ram is installed on a machine.
open a command prompt and execute this (replace "server01" with your server name):
the result in my case is:
BankLabel Capacity Caption DeviceLocator
1073741824 Physical Memory DIMM 01
1073741824 Physical Memory DIMM 02
1073741824 Physical Memory DIMM 03
1073741824 Physical Memory DIMM 04
so, there are 4 dimm installed, each one 1GB
If you need, there are also other information, from command prompt try (change server01) :
wmic
/node:server01
memorychip
you'll see all the columns available.
You could also try to run
wmic /node:server01 mmemorychip
but the output is a little bit messed up, I don't suggest it to you
bye
Digger
after a lot of time far from my blog, I'm here again, this time to post a simple and quick command to determine remotely how much physical ram is installed on a machine.
open a command prompt and execute this (replace "server01" with your server name):
wmic /node:server01 memorychip get banklabel, devicelocator,caption,capacity
the result in my case is:
BankLabel Capacity Caption DeviceLocator
1073741824 Physical Memory DIMM 01
1073741824 Physical Memory DIMM 02
1073741824 Physical Memory DIMM 03
1073741824 Physical Memory DIMM 04
so, there are 4 dimm installed, each one 1GB
If you need, there are also other information, from command prompt try (change server01) :
wmic
/node:server01
memorychip
you'll see all the columns available.
You could also try to run
wmic /node:server01 mmemorychip
but the output is a little bit messed up, I don't suggest it to you
bye
Digger
mercoledì 14 dicembre 2011
Sniff switched network with ettercap-ng for windows
Hi all,
a quick guide about one (there are other) way to sniff network traffic in a switched lan.
The enviroment is:
PCA
PCB
monitoring-PC (os: win xp, 2 NICs installed)
my monitoring pc is a laptop with only 1 nic, so I used a DLINK external USB NIC (name: DUB-E100) as second NIC.
PCA is connecting to PCB
on your "monitoring-PC" you want to see(sniff) the traffic between A and B but you cannot install anything on them and they are connected using a switch.
The problem is that in a switched enviroment you usually cannot sniff packets like you do using an HUB.
If you have an hub you can connect it in the middle, else if you have a way to setup a monitoring port on the switch, ok, but else it's a problem.
You could ARP poisoning the devices to then sniff (or also do a mac flooding to put the switch in a failed open state), but in my experience this could be dangerous sometimes and it often doesn't work very well.
SOLUTION
A solution I found today is to use ETTERCAP-NG for windows.
You can install it on your monitoring pc, using 2 network card, configure it for a "bridged sniffing" and then run a sniffer like "Wireshark".
You simply need to disconnect A or B and put your monitoring pc in the middle using the 2 NICs.
example:
A--- (nic1)monitoringPC(nic2) ---- switch ----B
or
A--- switch ---(nic1)monitoringPC(nic2) ------B
This way the monitoringPC is acting as a bridge and the packets between A and B are visible on the monitoringPC.
ETTERCAP-NG
http://sourceforge.net/projects/ettercap/files/
open "unofficial binaries", then "windows", then download "ettercap-NG-0.7.3-win32.exe"
WIRESHARK
http://www.wireshark.org/
INSTRUCTIONS (on the monitoring pc with 2 nics installed, in my case XP operating system)
Download and install ettercap-ng, then download and install wireshark.
Start Ettercap-ng
from the "Sniff" menu select "Bridged sniff"

Then from the windows that appear select the nics to be used for creating the bridge

Now from the "Start" menu select "Start sniffing"

Now you can open "Wireshark" (or other sniffing tool) to see the traffic

The red arrows indicate what I changed from the default.
Important is to select "promiscuous" else you'll not see all the packets as they are not directed to you (the monitorinc pc), then I changed the nic to the USB one (but also the other is ok).
Unflagged "Automatic scrolling" because I prefere this way, but this is up to you.
That's all, at this point you should see all the packets between the 2 machines.
bye
Digger
a quick guide about one (there are other) way to sniff network traffic in a switched lan.
The enviroment is:
PCA
PCB
monitoring-PC (os: win xp, 2 NICs installed)
my monitoring pc is a laptop with only 1 nic, so I used a DLINK external USB NIC (name: DUB-E100) as second NIC.
PCA is connecting to PCB
on your "monitoring-PC" you want to see(sniff) the traffic between A and B but you cannot install anything on them and they are connected using a switch.
The problem is that in a switched enviroment you usually cannot sniff packets like you do using an HUB.
If you have an hub you can connect it in the middle, else if you have a way to setup a monitoring port on the switch, ok, but else it's a problem.
You could ARP poisoning the devices to then sniff (or also do a mac flooding to put the switch in a failed open state), but in my experience this could be dangerous sometimes and it often doesn't work very well.
SOLUTION
A solution I found today is to use ETTERCAP-NG for windows.
You can install it on your monitoring pc, using 2 network card, configure it for a "bridged sniffing" and then run a sniffer like "Wireshark".
You simply need to disconnect A or B and put your monitoring pc in the middle using the 2 NICs.
example:
A--- (nic1)monitoringPC(nic2) ---- switch ----B
or
A--- switch ---(nic1)monitoringPC(nic2) ------B
or
...etc (exchange nic1 and nic2)
This way the monitoringPC is acting as a bridge and the packets between A and B are visible on the monitoringPC.
ETTERCAP-NG
http://sourceforge.net/projects/ettercap/files/
open "unofficial binaries", then "windows", then download "ettercap-NG-0.7.3-win32.exe"
WIRESHARK
http://www.wireshark.org/
INSTRUCTIONS (on the monitoring pc with 2 nics installed, in my case XP operating system)
Download and install ettercap-ng, then download and install wireshark.
Start Ettercap-ng
from the "Sniff" menu select "Bridged sniff"
Then from the windows that appear select the nics to be used for creating the bridge
Now from the "Start" menu select "Start sniffing"
Now you can open "Wireshark" (or other sniffing tool) to see the traffic
The red arrows indicate what I changed from the default.
Important is to select "promiscuous" else you'll not see all the packets as they are not directed to you (the monitorinc pc), then I changed the nic to the USB one (but also the other is ok).
Unflagged "Automatic scrolling" because I prefere this way, but this is up to you.
That's all, at this point you should see all the packets between the 2 machines.
bye
Digger
venerdì 2 dicembre 2011
Windows 7 Search - missing files - resolution
Hi all,
are you in the same situation as me?
Are you searching in a particular folder (and subfolders) for a filename, or for content, and AS ALWAYS windows 7 search doesn't find it? also if you know for sure the file is there and/or the content is there in some file??
Honestly I hate the way Windows 7 indexes everything (slowing down the pc) just to speed up searching something from time to time, and then also you don't find it because at the end it doesn't work as it should...
Ok, there are some tips to make windows search working better, like unflagging all the folders in the indexing option, in this way windows will search not using the indexing at all.
Then you'll not find content anymore I suspect, so you should flag the folder "one shot" just to start indexing on demand (but you should also disable indexing backoff to make it works).
Ok, the REAL solution?
DON'T USE WINDOWS SEARCH... use something else
Unflag ALL the flags in the indexing options so that no folder is indexed (this will speed up you pc in some way), just keep Outlook flag so you can search mails.
Then istall some search tool (I'm using Agent Ransack as it does its job well) and use it instead!
are you in the same situation as me?
Are you searching in a particular folder (and subfolders) for a filename, or for content, and AS ALWAYS windows 7 search doesn't find it? also if you know for sure the file is there and/or the content is there in some file??
Honestly I hate the way Windows 7 indexes everything (slowing down the pc) just to speed up searching something from time to time, and then also you don't find it because at the end it doesn't work as it should...
Ok, there are some tips to make windows search working better, like unflagging all the folders in the indexing option, in this way windows will search not using the indexing at all.
Then you'll not find content anymore I suspect, so you should flag the folder "one shot" just to start indexing on demand (but you should also disable indexing backoff to make it works).
Ok, the REAL solution?
DON'T USE WINDOWS SEARCH... use something else
Unflag ALL the flags in the indexing options so that no folder is indexed (this will speed up you pc in some way), just keep Outlook flag so you can search mails.
Then istall some search tool (I'm using Agent Ransack as it does its job well) and use it instead!
lunedì 10 ottobre 2011
Server uptime - Last Boot time
Hi all,
I would like to share with you this nice and useful command from the console to retrieve the local/remote system last boot time.
It's useful for example to calculate the uptime of a remote server
I would like to share with you this nice and useful command from the console to retrieve the local/remote system last boot time.
It's useful for example to calculate the uptime of a remote server
wmic /node:"servername" os get lastbootuptime
to retrive the local boottime simply don't use the /node option
bye
venerdì 29 luglio 2011
Remotely register DLL libraries
Hi all,
we have an application here around the network in quite all the clients that stops working when we deploy Office2010 as a dll file got missing on the client itself.
The fastest solution is to copy the dll back and to register it again.
If you want to do it remotely, and I don't mean with remote desktop, you can do it like this:
Prerequisites:
- You are logged on your pc with a user with admin rights on the target machine
- you already downloaded PSTOOLS from here:
http://technet.microsoft.com/it-it/sysinternals/bb897553.aspx
and have psexec command ready to be run on the disk
(I've already remotely copied the dll file to the c:\windows\system32 on the target machine)
1. open the command prompt
2. change to the psexec directory
3. submit this command:
psexec \\pcname cmd
A command prompt appears on your pc, but it is executing on the target machine (named pcname) !
submit the command to register the dll, but silently because we don't want any message on the target (message that the user will not see anyway as we are executing in a different context):
regsvr32 /s mylibrary.dll
/s is for "silent"
mylibrary.dll is the .dll to be registered
type
exit
to close the remote command prompt and then exit again to close local prompt
that's all, the application is now working again :)
P.S: I used it logged on my pc with a user with admin rights on the target, but if you are not, you could try it with the switches:
-u user -p password
that should do the job (not tried)
bye
Digger
we have an application here around the network in quite all the clients that stops working when we deploy Office2010 as a dll file got missing on the client itself.
The fastest solution is to copy the dll back and to register it again.
If you want to do it remotely, and I don't mean with remote desktop, you can do it like this:
Prerequisites:
- You are logged on your pc with a user with admin rights on the target machine
- you already downloaded PSTOOLS from here:
http://technet.microsoft.com/it-it/sysinternals/bb897553.aspx
and have psexec command ready to be run on the disk
(I've already remotely copied the dll file to the c:\windows\system32 on the target machine)
1. open the command prompt
2. change to the psexec directory
3. submit this command:
psexec \\pcname cmd
A command prompt appears on your pc, but it is executing on the target machine (named pcname) !
submit the command to register the dll, but silently because we don't want any message on the target (message that the user will not see anyway as we are executing in a different context):
regsvr32 /s mylibrary.dll
/s is for "silent"
mylibrary.dll is the .dll to be registered
type
exit
to close the remote command prompt and then exit again to close local prompt
that's all, the application is now working again :)
P.S: I used it logged on my pc with a user with admin rights on the target, but if you are not, you could try it with the switches:
-u user -p password
that should do the job (not tried)
bye
Digger
venerdì 10 giugno 2011
Windows Update non funziona, errore 0x8DDD0018
Ciao,
oggi ho perso un sacco di tempo per risolvere questo problema, magari questo post potrebbe risparmiarne un po' a qualcun altro...
Seguendo i consigli di Microsoft ho controllato i servizi BITS, Aggiornamenti automatici, Registro eventi etc, ma purtroppo erano tutti correttamente avviati.
Nel log degli eventi e in quello degli updates non c'erano indicazioni su quale fosse il vero problema, allora alla fine l'unica cosa che mi ha salvato è stato di REINSTALLARE windows update.
Premetto che la procedura potrebbe chiedervi di inserire il cd con la service pack, quindi nel caso il vostro sistema operativo sia servicepakkato vi consiglio di assicurarvi che i files siano ancora sul pc, oppure in alternativa procuratevi la servicepack, oppure il cd con la service pack in modo da avere il tutto a disposizione durante lo step successivo.
Per reinstallare windows update fate cosi:
1. aprite il prompt (esegui, CMD, invio)
2. digitate questo comando e date invio:
%windir%\System32\rundll32.exe setupapi,InstallHinfSection DefaultInstall 132 %windir%\inf\au.inf
3. a questo punto potrebbe chiedervi i famosi files della service pack, fatelo puntare a dove li avete salvati
4. riavviate il pc
5. aprite IE e provate ad andare sul sito di windows update
Se tutto va bene dovrebbe funzionare
ciao
oggi ho perso un sacco di tempo per risolvere questo problema, magari questo post potrebbe risparmiarne un po' a qualcun altro...
Seguendo i consigli di Microsoft ho controllato i servizi BITS, Aggiornamenti automatici, Registro eventi etc, ma purtroppo erano tutti correttamente avviati.
Nel log degli eventi e in quello degli updates non c'erano indicazioni su quale fosse il vero problema, allora alla fine l'unica cosa che mi ha salvato è stato di REINSTALLARE windows update.
Premetto che la procedura potrebbe chiedervi di inserire il cd con la service pack, quindi nel caso il vostro sistema operativo sia servicepakkato vi consiglio di assicurarvi che i files siano ancora sul pc, oppure in alternativa procuratevi la servicepack, oppure il cd con la service pack in modo da avere il tutto a disposizione durante lo step successivo.
Per reinstallare windows update fate cosi:
1. aprite il prompt (esegui, CMD, invio)
2. digitate questo comando e date invio:
%windir%\System32\rundll32.exe setupapi,InstallHinfSection DefaultInstall 132 %windir%\inf\au.inf
3. a questo punto potrebbe chiedervi i famosi files della service pack, fatelo puntare a dove li avete salvati
4. riavviate il pc
5. aprite IE e provate ad andare sul sito di windows update
Se tutto va bene dovrebbe funzionare
ciao
venerdì 27 maggio 2011
Systeminfo e findstr : Ricerca informazioni
Ho trovato questo comando molto interessante per recuperare alcune informazioni utili sul sistema locale in uso:
systeminfo
se volessimo filtrare per qualche informazione in particolare, ad esempio un aggiornamento microsoft:
systeminfo | findstr "KB2079403"
se poi vogliamo recuperare questa informazione da una macchina remota sulla rete:
systeminfo /s \\nomemacchina | findstr "KB2079403"
Il comando "findstr" può tornare utile da solo anche per altri tipi di ricerca, ad esempio per cercare TUTTI i files *.txt (partendo da C:\ e includendo tutte le sottocartelle) che contengono la parola "test" possiamo digitare:
findstr /S test c:\*.txt
potete divertirvi a sperimentare tutte le numerose opzioni :)
ATTENZIONE
di default la ricerca è CASE-SENSITIVE quindi bisogna stare attenti alle maiuscole/minuscole, se si vuole fare una ricerca indipendentemente dal case aggiungere lo switch /i cosi:
findstr /I /S test c:\*.txt
(thanks to SerJ)
di default la ricerca è CASE-SENSITIVE quindi bisogna stare attenti alle maiuscole/minuscole, se si vuole fare una ricerca indipendentemente dal case aggiungere lo switch /i cosi:
findstr /I /S test c:\*.txt
(thanks to SerJ)
giovedì 21 aprile 2011
Windows: copia di file attraverso la rete , riduzione dell'uso della banda
Ciao,
vi è mai capitato di dover copiare una gran quantità di dati attraverso la rete?
A volte lo possiamo fare utilizzando tutta la banda a disposizione, ma altre volte purtroppo la cosa non è fattibile, pensiamo a quando stiamo copiando dati attraverso una WAN dove oltre a noi passano i dati di tutti gli altri utenti e su cui sono basati numerosi servizi.
Se copiassimo al massimo della velocità ammazzeremmo la banda e probabilmente avremmo tutta una serie di disservizi e utenti arrabbiati che si lamenterebbero.
Soluzione:
un modo per copiare files potendo limitare l'uso della banda è ROBOCOPY
tra i parametri di questa utility infatti esiste /IPG:ms che ci permette di specificare quanto tempo deve intercorrere (in ms) tra l'invio di un pacchetto e quello successivo.
Quindi non ci permette direttamente di specificare quanta banda usare, ma andando un po' a tentativi e magari usando un tool che ci visualizza l'uso della banda da parte del nostro pc, arriveremo presto a settare il valore in ms ideale per la nostra copia.
Ecco un esempio:
robocopy "\\fileserver001\share\dati" "c:\backup\" *.pst /IPG:10
il risultato potrebbe essere questo ( notate i 3,2mB/s ) :
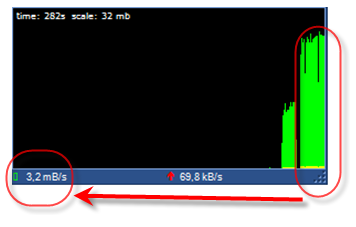
diciamo che 3.2mB/s non ci va bene e vogliamo occupare MENO banda? proviamo a mettere 20:
robocopy "\\fileserver001\share\dati" "c:\backup\" *.pst /IPG:20
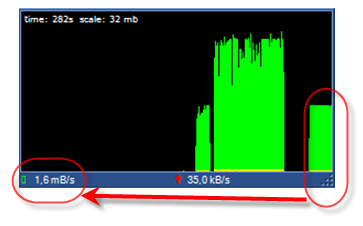
visto ? l'occupazione è passata da 3.2 a 1.6mB/s
A chi interessasse, il tool usato per monitorare la banda nell'esempio è FreeMeter
ciao
alla prossima
vi è mai capitato di dover copiare una gran quantità di dati attraverso la rete?
A volte lo possiamo fare utilizzando tutta la banda a disposizione, ma altre volte purtroppo la cosa non è fattibile, pensiamo a quando stiamo copiando dati attraverso una WAN dove oltre a noi passano i dati di tutti gli altri utenti e su cui sono basati numerosi servizi.
Se copiassimo al massimo della velocità ammazzeremmo la banda e probabilmente avremmo tutta una serie di disservizi e utenti arrabbiati che si lamenterebbero.
Soluzione:
un modo per copiare files potendo limitare l'uso della banda è ROBOCOPY
tra i parametri di questa utility infatti esiste /IPG:ms che ci permette di specificare quanto tempo deve intercorrere (in ms) tra l'invio di un pacchetto e quello successivo.
Quindi non ci permette direttamente di specificare quanta banda usare, ma andando un po' a tentativi e magari usando un tool che ci visualizza l'uso della banda da parte del nostro pc, arriveremo presto a settare il valore in ms ideale per la nostra copia.
Ecco un esempio:
robocopy "\\fileserver001\share\dati" "c:\backup\" *.pst /IPG:10
il risultato potrebbe essere questo ( notate i 3,2mB/s ) :
diciamo che 3.2mB/s non ci va bene e vogliamo occupare MENO banda? proviamo a mettere 20:
robocopy "\\fileserver001\share\dati" "c:\backup\" *.pst /IPG:20
visto ? l'occupazione è passata da 3.2 a 1.6mB/s
A chi interessasse, il tool usato per monitorare la banda nell'esempio è FreeMeter
ciao
alla prossima
giovedì 5 agosto 2010
The terminal server has exceeded the maximum number of allowed connections
Rieccoci qui,
se vi capita di collegarvi spesso in controllo remoto utilizzando il remote desktop di microsoft a server utilizzati anche da altre persone può esservi capitato il famigerato messaggio "The terminal server has exceeded the maximum number of allowed connections".
A questo punto non siete piu in grado di collegarvi.
Se non avete voglia, modo o altro di far si che gli altri che hanno aperto (e lasciato li) le sessioni sul server provvedano a chiuderle, le potete chiudere voi da remoto per poi collegarvi.
Esiste uno snap-in di microsoft per effettuare l'operazione, ma di seguito vi illustro il modo da riga di comando:
Con il comando qwinsta eseguiamo una query sul server remoto 192.168.1.100
Il risultato ci dice che ci sono 2 sessioni disconnesse con la user "utente1" (quindi è stata usata la stessa user da computer diversi creando cosi 2 sessioni distinte).
Se vogliamo poterci collegare in remote desktop dobbiamo terminare almeno una delle due sessioni, per farlo guardiamo l' ID della sessione da terminare (nell'esempio la 1) e utilizziamo il comando rwinsta
A questo punto se ci va possiamo ridare il comando qwinsta per vedere se la sessione con ID=1 è sparita, dopo di che potremo collegarci in controllo remoto
alla prossima
se vi capita di collegarvi spesso in controllo remoto utilizzando il remote desktop di microsoft a server utilizzati anche da altre persone può esservi capitato il famigerato messaggio "The terminal server has exceeded the maximum number of allowed connections".
A questo punto non siete piu in grado di collegarvi.
Se non avete voglia, modo o altro di far si che gli altri che hanno aperto (e lasciato li) le sessioni sul server provvedano a chiuderle, le potete chiudere voi da remoto per poi collegarvi.
Esiste uno snap-in di microsoft per effettuare l'operazione, ma di seguito vi illustro il modo da riga di comando:
 qwinsta /server:192.168.1.100


 NOMESESSIONE   NOMEUTENTE        ID STATO  TIPO    DISPOSITIVO
                          0 Disc  rdpwd
 rdp-tcp                 65536 Rimani in ascolto rdpwd
 console                  4 Conn  wdcon
          utente1         1 Disc  rdpwd
          utente1         3 Disc  rdpwd


 rwinsta 1 /server:192.168.1.100
Con il comando qwinsta eseguiamo una query sul server remoto 192.168.1.100
Il risultato ci dice che ci sono 2 sessioni disconnesse con la user "utente1" (quindi è stata usata la stessa user da computer diversi creando cosi 2 sessioni distinte).
Se vogliamo poterci collegare in remote desktop dobbiamo terminare almeno una delle due sessioni, per farlo guardiamo l' ID della sessione da terminare (nell'esempio la 1) e utilizziamo il comando rwinsta
A questo punto se ci va possiamo ridare il comando qwinsta per vedere se la sessione con ID=1 è sparita, dopo di che potremo collegarci in controllo remoto
alla prossima
lunedì 28 settembre 2009
Windows 7 - Virtual Box - Shared Folder
Ehilà, eccoci qui di nuovo.
2 versioni della storia, corta e lunga.
== Versione Corta ==
Esegui \\vboxsvr\nomeshare e dai invio
(dove nomeshare è il nome della cartella sull'host)
(dove nomeshare è il nome della cartella sull'host)
== Versione Lunga ==
innanzitutto chi mi conosce si chiederà come mai Windows 7 visto che lo odio :D
beh, che dire, lo odio ma purtroppo mi toccherà cominciare ad usarlo visto che tra un po' lo installeremo su tutte le macchine al lavoro e dovrò gestirlo :(
Visto che devo cominciare a conoscerlo, quale modo migliore che installare una macchina virtuale e infilarci su la RC1 che gentilmente MZ ci mette a disposizione ...
Potevo usare VmWare, prodotto che di gran lunga preferisco, ma visto che andavo di corsa e che VirtualBox si installa molto piu velocemente ho preferito questa strada.
Tempo fa avevo installato Windows XP su VirtualBox e avevo trovato comoda la funzionalità di "Shared Folder " che mette a disposizione per scambiare files tra l'host e la virtual machine.
Praticamente sull'host si crea una cartella dove mettere i files da condividere, in virtualbox gli si dice che quella cartella è dedicata allo shared folder e voilà, nella virtual machine basta andare in "risorse di rete" - "tutta la rete" e li trovate la Virtual Box shared folder, doppio click e accedete alla cartella per copiarvi avanti e indietro i files.
W7
in W7 non è così, sarà che lo conosco ancora troppo poco io, sarà che non funziona l'integrazione tra Virtual Box e W7 fatto sta che se si cerca di trovare l'icona dei VirtualBox Shared Folder seguendo lo stesso procedimento di XP... semplicemente non lo si trova.
Allora, siccome sono troppo pigro per cercare l'icona in mezzo a quest'orrenda ( e poco professionale) interfaccia grafica di W7, come sempre ho seguito "la mia via".
Essendo una share quella che vogliamo aprire, si fa come sempre quando si vuole aprire una share, quindi si va nel menu di avvio, ESEGUI e si digita questo, seguito dal consueto OK:
\\vboxsvr\nomeshare
(dove nomeshare è il nome della cartella sull'host)
( che altro non è che il solito formato: \\servername\sharename )
se tutto va bene si aprirà la cartella condivisa.
Se poi volete velocizzare la cosa, trascinate un collegamento a sta cartella appena aperta da qualche parte e la prossima volta vi limiterete a cliccare sul collegamento.
Iscriviti a:
Post (Atom)